Senin, 14 November 2016

QueueTree & Mangle

Nama : Adwin Bintang Branata
 
Queue Tree & Mangle
Hari / Tanggal : Selasa / 15-11-16
Kelas  : XII TKJ 2
SK/KD : -
No.Jobsheet : 1
Guru Bidang : Bang Maman


Queue Tree & Mangle


Penjelasan :
Queue Tree berfungsi untuk mengimplementasikan fungsi yang lebih komplex dalam limit bandwidth pada mikrotik dimana penggunaan packet mark nya memiliki fungsi yang lebih baikDigunakan untuk membatasi satu arah koneksi saja baik itu download maupun upload. Secara umum Queue Tree ini tidak terlihat berbeda dari Simple Queue.

Mangle pada mikrotik merupakan suatu cara untuk menandai paket data dan koneksi tertentu yang dapat diterapkan pada fitur mikrotik lainnya, sepeti pada routes, pemisahan bandwidth pada queues, NAT dan filter rules. Tanda mangle yang ada pada router mikrotik hanya bisa digunakan pada router itu sendiri. Dan yang perlu diingat bahwa proses pembacaan rule mangle ini dilakukan dari urutan pertama ke bawah. 

Konfigurasi : 
1. Mark Connection - TCP
Nb : Src.Address = IP WLAN
2. Mark Packet – TCP
3. Mark Connection - UDP

Nb : Src.Address = IP WLAN
4. Mark Packet - UDP

5. Mark Connection - ICMP

Nb : Src.Address = IP WLAN
6. Mark Packet - ICMP

7. Mark Connection - Sisa

Nb : Src.Address = IP WLAN
8. Mark Packet - Sisa

9. QueueTree – Parent

Nb : Parent pada "Total Download" adalah ether yang terhubung dari router ke server oleh kabel

10. QueueTree – Child TCP

11. QueueTree – Child UDP

12. QueueTree – Child ICMP

13. QueueTree – Child Sisa

Hasil akhir akan diperlihatkan traffic koneksi seperti berikut :

Senin, 07 November 2016

distribute RIP dengan OSPF

Redistribute RIP dengan OSPF
  
Note : Biru muda = RIP dan Kuning = OSPF
           IP yang digunakan adalah yang ada dikonfigurasi
Konfigurasi nya :
- Pemberian IP Address
 - Bogor    : Fa0/0 = 10.10.10.1/24
                   Fa0/1 = 192.168.10.1/24
 - PC0       : Fa0   = 192.168.10.2/24 gateway 192.168.10.1
 - Bekasi   : Fa0/0 = 10.10.10.2/24
                   Fa0/1 = 20.20.20.1/24
 - Bali       : Fa0/0 = 20.20.20.2/24
                  Fa0/1 = 30.30.30.1/24
 - Bengkulu : Fa0/0 = 30.30.30.2/24
                     Fa0/1 = 192.168.20.1/24
 - PC1        : Fa0   = 192.168.20.2/24 gateway 192.168.20.1

- Setting Bogor :

 - Bogor(config)#router rip
 - Bogor(config-router)#v 2
 - Bogor(config-router)#network 10.10.10.0
 - Bogor(config-router)#network 192.168.10.0
 - Bogor(config-router)#no auto-summary
 - Bogor(config-router)#ex
 - Bogor(config)#


- Setting Bali :

 - Bali(config)#router ospf 1
 - Bali(config-router)#network 20.20.20.0 0.0.0.255 area 0
 - Bali(config-router)#network 30.30.30.0 0.0.0.255 area 0
 - Bali(config-router)#ex
 - Bali(config)#

- Setting Bengkulu :

 - Bengkulu(config)#router ospf 1
 - Bengkulu(config-router)#network 30.30.30.0 0.0.0.255 area 0
 - Bengkulu(config-router)#network 192.168.20.0 0.0.0.255 area 0
 - Bengkulu(config-router)#ex
 - Bengkulu(config)#


- Setting Bekasi :
 - Bekasi(config)#router rip
 - Bekasi(config-router)#v 2
 - Bekasi(config-router)network 10.10.10.0
 - Bekasi(config-router)#redistribute ospf 1 metric 1
 - Bekasi(config)#router ospf 1
 - Bekasi(config-router)#network 20.20.20.0 0.0.0.255 area 0
 - Bekasi(config-router)#redistribute rip subnets
Hasil Akhir

PPTP Side to Side

PPTP Side to Side


1. set name pada setiap router (mikrotik)
2. masuk winbox search ip lalu connect
3. lakukan konfigurasi pada router isp (R1) terlebih dahulu

   ip address
- 10.10.10.1/24 ether2
- 192.168.11.1/24 ether1
- 20.20.20.1/24 ether3

    ip dns
- 8.8.8.8 8.8.4.4 centang allow

    ip firewall
- nat- srcnat -out.int(ether1) -action(masquerade)

    ip route
-192.168.11.1
-dst (192.168.10.0/24 gateway 10.10.10.2)
-dst (192.168.20.0/24 gateway 20.20.20.2)

kamudian ping 8.8.8.8 di terminal


4. router jakarta(r2)

    ip address
- 10.10.10.2/24 ether1
- 192.168.10.1/24 ether3

    ip dns
- 8.8.8.8 8.8.4.4 centang allow

    ip firewall
- nat- srcnat -out.int(ether1) -action(masquerade)

    ip route
- 10.10.10.1

    buat pptp
-klik ppp- klik pptp server- lalu klik enable
-klik submenu secrets- klik (+) untuk membuat user baru
    user : anggi
    pass : 1234
    service : pptp
    local add : 1.1.1.1
    remote add : 1.1.1.2
    routers    : 192.168.20.0/24 1.1.1.2 (ok)

kemudian ping 8.8.8.8 dan 192.168.20.1 pastikan reply


5. router surabaya (r3)

 ip address
- 20.20.20.2/24 ether1
- 192.168.20.1/24 ether3

    ip dns
- 8.8.8.8 8.8.4.4 centang allow

    buat pptp
-klik ppp- klik(+) pilih pptp client
submenu gineral name = to jakarta(r2)
submenu dial out : connect to = 10.10.10.2
            user =anggi
            pass =1234

    ip firewall
- nat- srcnat -out.int(ether1) -action(masquerade)
- nat- srcnat -out.int(to jakarta) -action(masquerade)

kemudian ping 8.8.8.8 dan 192.168.10.1 pastikan reply


6. hasilnya
   a. ping pc1 ke pc2

  b. ping pc2 ke pc1

PPPOE

PPPOE


Konfigurasinya

PPPOE

1. Buat IP Address

R1 = eth0 = 192.168.11.2/24
         eth1 = 192.168.10.1/24

2. IP DNS

8.8.8.8
Ceklist "Allow Remote Request"

3. IP routes

Gateway = 192.168.11.1

4. IP POOL

Name = PPPOE
Address = 192.168.100.100-192.168.100.200

5. Submenu Profiles pada PPP

klik pada default
ubah local address = 192.168.10.1
ubah remote address = PPPOE

6. Submenu Secrets pada PPP

Klik "+"
Name = (bebas)
Password = (bebas)
Service = pppoe

7. Submenu  PPPoE Servers pada PPP

Klik "+"
Service Name = (bebas)
Interface = ether2
Ceklist "One Session Per Host"

8. IP Firewall

Klik "+"
General = Chain : srcnat , srcaddress : 192.168.100.100-192.168.100.200 Out.Int : ether1
Action = Masquerade

9. Pada Windows XP

Control Panel
Network Connection
Klik "Create a new connection"
Klik "Next"
Pilih yang paling atas lalu next
Pilih yang tengah lalu next
Isi nama ISP = (Service name yang kita buat pada PPPoe Servers)
Isi username dan password = (user dan password pada submenu secrets)
Klik Finish

10. HASIL AKHIR

Ping 8.8.8.8 dengan CMD
Ping detik.com dengan CMD

VPN (Virtual Private Network

VPN ( Virtual Private Network)
Konfigurasi nya :
- Pemberian IP Address
- ISP(R1)       : eth0 : 192.168.11.2/24
                       eth1 : 10.10.10.1/30
                       eth2 : 192.168.100.1/24
- Bogor(R2)  : eth0 : 10.10.10.2/30
                       eth1 : 192.168.10.1/24
- Win Xp        : eth0 : 192.168.100.2/24 192.168.100.1
- VPCS          : eth0 : 192.168.10.2/24 192.168.10.1

Setting ISP(R1) :

- Buat Internet Gateway

Setting Bogor(R2) :

- Buat Internet Gateway
- Lalu Setting PPP
 - Enable PPtP server
 - Klik PPP lalu Secret
 - Buat User
  - Username
  - Password
  - Service : pptp
  - Local address 192.168.10.1
  - Remote Address 192.168.10.(bebas)

Lalu Ke Win XP :

- Control Panel
- Network Connection
- Klik Create a new connection
- Klik Next
- Pilih Connect to the network at my workplace
- Pilih VPN
- Beri Nama Company
- lalu masukkan ip bogor eth 1 = 10.10.10.2
- Finish
- lalu connect dengan username dan password
 
Setelah terhubung Ping dari xp ke vpcs

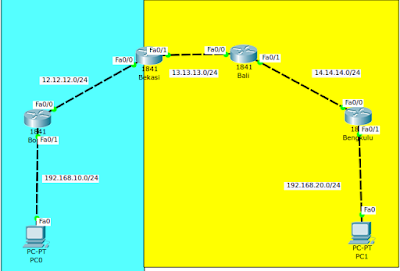
Redistribute RIP dengan EIGRP

Redistribute RIP dengan EIGRP
Note : Biru Muda = RIP & Kuning = EIGRP
Konfigurasi nya :
- Pemberian IP Address
 - Bogor       : Fa0/0 = 12.12.12.1/24
                      Fa0/1 = 192.168.10.1/24
 - PC0          : Fa0   = 192.168.10.2/24 gateway 192.168.10.1
 - Bekasi      : Fa0/0 = 12.12.12.2/24
                     Fa0/1 = 13.13.13.1/24
 - Bali          : Fa0/0 = 13.13.13.2/24
                     Fa0/1 = 14.14.14.1/24
 - Bengkulu : Fa0/0 = 14.14.14.2/24
                     Fa0/1 = 192.168.20.1/24
 - PC1          : Fa0   = 192.168.20.2/24 gateway 192.168.20.1

- Setting Bogor :

 - Bogor(config)#router rip
 - Bogor(config-router)#v 2
 - Bogor(config-router)#network 12.12.12.0
 - Bogor(config-router)#network 192.168.10.0
 - Bogor(config-router)#no auto-summary
 - Bogor(config-router)#ex
 - Bogor(config)#


- Setting Bali :

 - Bali(config)#router eigrp 10
 - Bali(config-router)#network 13.13.13.0
 - Bali(config-router)#network 14.14.14.0
 - Bali(config-router)#no auto-summary
 - Bali(config-router)#ex
 - Bali(config)#

- Setting Bengkulu :

 - Bengkulu(config)#router eigrp 10
 - Bengkulu(config-router)#network 14.14.14.0
 - Bengkulu(config-router)#network 192.168.20.0
 - Bengkulu(config-router)#no auto-summary
 - Bengkulu(config-router)#ex
 - Bengkulu(config)#

- Setting Bekasi :

 - Bekasi(config)#router rip
 - Bekasi(config-router)#v 2
 - Bekasi(config-router)#network 12.12.12.0
 - Bekasi(config-router)#no auto-summary
 - Bekasi(config-router)#redistribute eigrp 10 metric 1
 - Bekasi(config-router)#ex
 - Bekasi(config)#router eigrp 10
 - Bekasi(config-router)#network 13.13.13.0
 - Bekasi(config-router)#no auto-summary
 - Bekasi(config-router)#redistribute rip metric 1 1 1 1 1
 - Bekasi(config-router)#ex
Hasil Konfigruasi :

Redistribute Static dengan OSPF

Redistribute Static dengan OSPF
Konfigurasinya :
- Pemberian IP Address
 - Bogor       : Fa0/0 = 12.12.12.1/24
                     Fa0/1 = 192.168.10.1/24
 - PC0          : Fa0   = 192.168.10.2/24 gateway 192.168.10.1
 - Bekasi      : Fa0/0 = 12.12.12.2/24
                     Fa0/1 = 13.13.13.1/24
 - Bali          : Fa0/0 = 13.13.13.2/24
                     Fa0/1 = 14.14.14.1/24
 - Bengkulu : Fa0/0 = 14.14.14.2/24
                     Fa0/1 = 192.168.20.1/24
 - PC1          : Fa0   = 192.168.20.2/24 gateway 192.168.20.1

- Setting Bogor :
 - Bogor(config)#ip route 13.13.13.0 255.255.255.0 12.12.12.2
 - Bogor(config)#ip route 14.14.14.0 255.255.255.0 12.12.2.2
 - Bogor(config)#ip route 14.14.14.0 255.255.255.0 12.12.12.2
 - Bogor(config)#ip route 192.168.20.0 255.255.255.0 12.12.12.2

Setting Bekasi :
 - Bekasi(config)#router ospf 1
 - Bekasi(config-router)#network 13.13.13.0
 - Bekasi(config-router)#no auto-summary
 - Bekasi(config-router)#redistribute static subnets
 - Bekasi(config-router)#redistribute connected subnets
 - Bekasi(config-router)#ex
 - Bekasi(config)#ex
 - Bekasi(config)#ip route 192.168.10.0 255.255.255.0 192.168.10.1
 - Bekasi(config)#ip route 192.168.10.0 255.255.255.0 12.12.12.1

Setting Bali :
 - Bali(config)#router ospf 1
 - Bali(config-router)#network 13.13.13.0
 - Bali(config-router)#network 14.14.14.0
 - Bali(config-router)#no auto-summary
 - Bali(config-router)#redistribute static subnets
 - Bali(config-router)#redistribute connected subnets
 - Bali(config-router)#ex
 - Bali(config)#ex

Setting Bengkulu :
 - Bengkulu(config)#router ospf 1
 - Bengkulu(config-router)#network 14.14.14.0
 - Bengkulu(config-router)#network 192.168.20.0
 - Bengkulu(config-router)#no auto-summary
 - Bengkulu(config-router)#redistribute static subnets
 - Bengkulu(config-router)#redistribute connected subnets
 - Bengkulu(config-router)#ex
 - Bengkulu(config)#ex
Hasil Konfigurasi :

Redistribute Static dengan Rip

Redistribute Static dengan Rip
Note : Biru Muda  = Static
           Kuning       = RIPv2
Konfigurasinya : 
- Pemberian IP Address
 - Bogor       : Fa0/0 = 12.12.12.1/24
                     Fa0/1 = 192.168.10.1/24
 - PC0          : Fa0   = 192.168.10.2/24 gateway 192.168.10.1
 - Bekasi      : Fa0/0 = 12.12.12.2/24
                      Fa0/1 = 13.13.13.1/24
 - Bali          : Fa0/0 = 13.13.13.2/24
                     Fa0/1 = 14.14.14.1/24
 - Bengkulu : Fa0/0 = 14.14.14.2/24
                     Fa0/1 = 192.168.20.1/24
 - PC1          : Fa0   = 192.168.20.2/24 gateway 192.168.20.1
- Setting Bogor :
 - Bogor(config)#ip route 13.13.13.0 255.255.255.0 12.12.12.2
 - Bogor(config)#ip route 14.14.14.0 255.255.255.0 12.12.2.2
 - Bogor(config)#ip route 14.14.14.0 255.255.255.0 12.12.12.2
 - Bogor(config)#ip route 192.168.20.0 255.255.255.0 12.12.12.2
- Setting Bekasi :
 - Bekasi(config)#router rip
 - Bekasi(config-router)#v 2
 - Bekasi(config-router)#network 13.13.13.0
 - Bekasi(config-router)#no auto-summary
 - Bekasi(config-router)#redistribute static
 - Bekasi(config-router)#ex
 - Bekasi(config)#ex
 - Bekasi(config)#ip route 192.168.10.0 255.255.255.0 192.168.10.1
 - Bekasi(config)#ip route 192.168.10.0 255.255.255.0 12.12.12.1
Setting Bali :
 - Bali(config)#router rip
 - Bali(config-router)#v 2
 - Bali(config-router)#network 13.13.13.0
 - Bali(config-router)#network 14.14.14.0
 - Bali(config-router)#no auto-summary
 - Bali(config-router)#redistribute static
 - Bali(config-router)#ex
 - Bali(config)#ex

Setting Bengkulu :
 - Bengkulu(config)#router rip
 - Bengkulu(config-router)#v 2
 - Bengkulu(config-router)#network 14.14.14.0
 - Bengkulu(config-router)#network 192.168.20.0
 - Bengkulu(config-router)#no auto-summary
 - Bengkulu(config-router)#redistribute static
 - Bengkulu(config-router)#ex
 - Bengkulu(config)#ex
Hasil Konfigurasi :

Mengembalikan Panel UBUNTU Yang Hilang


dan berikut cara mengatasi :

1. Buka Terminal dengan cara tekan Ctrl + Alt + F2

2. Masukkan login user beserta passwordnya.

3. Lalu ketikkan perintah-perintah berikut (tiap perintah akhiri dengan ENTER):


gconftool --recursive-unset /apps/panel
rm -rf  /.gconf/apps/panel
pkill gnome-panel
sudo reboot
 4. Selamat panel telah muncul kembali

ACL Extended

ACL Extended
Karakterisik ACL secara umum
 Menentukan tipe traffic yang akan di control
 Menentukan karakteristrik traffic
 Mengidentifikasi traffic dengan permit atau deny
 Dapat men-deny traffic spesifik atau secara keseluruhan
 Terdapat implisit deny any pada akhir baris access list secara default
 Masing-masing baris hanya untuk satu protokol spesifik
 Masing-masing interface router maksimal hanya punya dua access list untuk masing- masing protocol, satu incoming traffic dan satu outgoing traffic
 Ketika access list di assign untuk interface, tentukan apakah untuk incoming atau outgoing
 Access list sifatnya global di router, tapi filter traffic hanya berlaku di interface yang di assign access list
 Masing-masing access list dapat di assign ke beberapa interface
 Akan tetapi tiap interface hanya boleh satu incoming dan satu outgoing
 Access list dapat digunakan untuk nge-log traffic yang match dengan access list statement
 Access list yang di applied ke inbound traffic dilakukan sebelum routing decision
 Access list yang di applied ke outbound traffic dilakukan setelah routing decision
 Ketikkan rule access list secara berurutan, dengan statement paling restrictive berada di atas

ACL Extended
1. Nomor : 100-199
2. Digunakan untuk filter source dan destination IP address
3. Dapat memfilter spesifik protocol IP dan port number
4. Tips : assign pada router yang terdekat dengan source (close to the source router)
Konfigurasinya :
a. Berikan IP pada Router dan PC / Laptop :
   - Untuk memberi nama pada setiap router konfigurasinya :
     - Router(config)#hostname R1
     - R1(config)#no domain-look

   - R1     : Fa 0/0   = 12.12.12.1/24
                Fa 0/1   = 192.168.10.1/24
                Fa 0/1/0 = 192.168.20.1/24
   - Laptop2    : Fa 0     = 192.168.10.2/24 gateway = 192.168.10.1
   - Laptop3    : Fa 0       = 192.168.20.2/24 gateway = 192.168.20.11
   - R2     : Fa 0/0   = 12.12.12.2/24
                Fa 0/1   = 20.20.20.1/24
   - Server    : Fa 0       = 20.20.20.2/24 gateway = 20.20.20.1
b. Setting R1 :
 - access-list 100 deny tcp 192.168.10.0 0.0.0.255 host 20.20.20.2 eq www
 - access-list 100 permit ip any any
 - int fa 0/1
 - ip access-group 100 in
Hasil Konfigurasi :

Laptop 2 tidak dapat mengakses web dari server
 Laptop3 dapat mengakses web dari server

ACL Standar

ACL Standart
Karakterisik ACL secara umum
- Menentukan tipe traffic yang akan di control
- Menentukan karakteristrik traffic
- Mengidentifikasi traffic dengan permit atau deny
- Dapat men-deny traffic spesifik atau secara keseluruhan
- Terdapat implisit deny any pada akhir baris access list secara default
- Masing-masing baris hanya untuk satu protokol spesifik
- Masing-masing interface router maksimal hanya punya dua access list untuk masing-
masing protocol, satu incoming traffic dan satu outgoing traffic
-  Ketika access list di assign untuk interface, tentukan apakah untuk incoming atau outgoing
- Access list sifatnya global di router, tapi filter traffic hanya berlaku di interface yang di assign
access list
- Masing-masing access list dapat di assign ke beberapa interface
- Akan tetapi tiap interface hanya boleh satu incoming dan satu outgoing
- Access list dapat digunakan untuk nge-log traffic yang match dengan access list statement
 - Access list yang di applied ke inbound traffic dilakukan sebelum routing decision
- Access list yang di applied ke outbound traffic dilakukan setelah routing decision
- Ketikkan rule access list secara berurutan, dengan statement paling restrictive berada di
atas

ACL Standard
1. Nomor : 1-99
2. Digunakan untuk filter source IP address
3. Permit / Deny semua protocol suite TCP/IP
4. Tips : assign pada router yang terdekat dengan destination (close to the destination
router)
Konfigurasi nya :
 a. Berikan IP pada Router dan PC / Laptop :
   - Untuk memberi nama pada setiap router konfigurasinya :
     - Router(config)#hostname R1
     - R1(config)#no domain-look

   - R1             : Fa 0/0   = 12.12.12.1/24
                        Fa 0/1   = 192.168.10.1/24
                        Fa 0/1/0 = 192.168.20.1/24
   - Laptop2    : Fa 0     = 192.168.10.2/24 gateway = 192.168.10.1
   - Laptop3    : Fa 0       = 192.168.20.2/24 gateway = 192.168.20.11
   - R2             : Fa 0/0   = 12.12.12.2/24
                        Fa 0/1   = 20.20.20.1/24
   - Server       : Fa 0       = 20.20.20.2/24 gateway = 20.20.20.1
b. Buat OSPF pada setiap Router :
 - Setting R1 :
   - R1(config)#router ospf 1
   - R1(config-router)#network 12.12.12.0 0.0.0.255 area 0
   - R1(config-router)#network 192.168.10.0 0.0.0.255 area 0
   - R1(config-router)#network 192.168.20.0 0.0.0.255 area 0
   - R1(config-router)#ex
   - R1(config)#do wr
     Building configuration...
     [OK]
     R1(config)#
 - Setting R2 :
   - R2(config)#router ospf 1
   - R2(config-router)#network 12.12.12.0 0.0.0.255 area 0
   - R2(config-router)#network 20.20.20.0 0.0.0.255 area 0
   - R2(config-router)#ex
   - R2(config)#do wr
     Building configuration...
     [OK]
     R2(config)#
c. Untuk memblokir akses dari Laptop2 ke Server
 - R2(config)#access
 - R2(config)#access-list 1 deny 192.168.10.0 0.0.0.255
 - R2(config)#access-list 1 permit any
 - R2(config)#int fa 0/1
 - R2(config-if)#ip access-group 1 out
Hasil Konfigurasi :

PC1 yang bisa mengakses


PC0 Tidak bisa Mengakses

Cara Install Telegram pada Ubuntu 14.04

Telegram

1. Download Telegram Disini dan Letakan pada Dekstop
2. Masuk terminal lalu  ketik :
    cd Dekstop/
3. Lalu Extract dengan mengetik :
    tar -xvf (nama file telegram)
4. Lalu masuk ke folder hasil extract
5. lalu klik 2x pada "Telegram" atau klik kanan lalu klik run

OSPF

OSPF

- OSPF singkatan dari Open Shortest Path First
- OSPF merupakan routing protocol open standar yang diimplementasikan oleh   berbagai macam vendor, termasuk Cisco
- Link-state protocol
- OSPF bekerja dengan menggunakan algoritma Dijkstra
- Hop count unlimited
- Metric: cost (cost=10^8 / BW)
- Administrative Distance: 110
- Classless routing protocol
- Mendukung VLSM dan CIDR
- Hanya mendukung equal cost load balancing
- Terdapat konsep area untuk memudahkan manajemen dan control traffic
- Menyediakan design hierarki dengan multiple area
- Harus memiliki satu area yang disebut sebagai area 0 atau backbone area
- Semua area selain 0 (non-backbone area) harus terhubung ke area 0
- Dari scalabilitas lebih baik dibandingkan dengan protocol distance vector
- Mendukung autentikasi
- Update melalui multicast address: 224.0.0.5
- Konvergensi cepat
- Mengirimkan hello packet setiap 10 second
- Trigger/Incrementeal update 
  o Router mengirimkan update hanya jika terjadi perubahan dan tidak mengirimkan semua routing table pada periodic update
Keuntungan OSPF
- Open standard
- Tidak ada batasan jumlah hop
- Loop free
- Konvergensi lebih cepat
 
Kerugian OSPF
- Mengkonsumsi lebih banyak resource CPU
- Kompleks dalam hal design dan implementasi
- Hanya mendukung equal load balancing
- Hanya mendukung protocol IP
Konfigurasi nya :
 a. Berikan IP pada Router dan PC / Laptop :
   - Untuk memberi nama pada setiap router konfigurasinya :
     - Router(config)#hostname R1
     - R1(config)#no domain-look

   - R1 :   Fa 0/0   = 10.10.10.1/30
              Fa 0/1   = 192.168.1.1/24
   - PC0: Fa 0     = 192.168.1.2/24 gateway = 192.168.1.1
   - R2 :  Fa 0/0   = 10.10.10.2/30
              Fa 0/1   = 192.168.2.1/24
   - PC1: Fa 0       = 192.168.2.2/24 gateway = 192.168.2.1

 b. Setting R1 :
   - R1(config)#router ospf 1
   - R1(config-router)#network 10.10.10.0 0.0.0.255 area 0
   - R1(config-router)#network 192.168.1.0 0.0.0.255 area 0
   - R1(config-router)#ex
   - R1(config)#do wr
     Building configuration...
     [OK]
     R1(config)#

 c. Setting R2 :
   - R2(config)#router ospf 1
   - R2(config-router)#network 10.10.10.0 0.0.0.255 area 0
   - R2(config-router)#network 192.168.2.0 0.0.0.255 area 0
   - R2(config-router)#ex
   - R2(config)#do wr
     Building configuration...
     [OK]
     R2(config)#
Hasil Konfigurasi :

EIGRP

EIGRP
EIGRP disebut juga sebagai routing protocol distance vector, terkadang disebut juga advanced
distance vector atau routing protocol hybrid.
Berikut ini beberapa fitur dari EIGRP :

- Cisco open standar protocol (sebelumnya proprietary)
- Termasuk classless routing protocol
- Update perubahan topologi secara dinamis
- Metric (32 bit) : Composite Metric (BW + Delay + Load + MTU + Reliability)
- Administrative Distance: 90
- Update menggunakan multicast: 224.0.0.10
- Jumlah maksimum hop count: 255 (default 100)
- Mendukung protocol IP, IPX, Apple Talk
- Hello packet dikirim setiap 5 second (dead interval 15 second)
- Konvergensi cepat
- Menggunakan algoritma DUAL (Diffusing Update Algorithm)
- Mendukung equal dan unequal cost load balancing
Keuntungan EIGRP
- Terdapat backup route jika best route down (successor=primary, feasible
successor=backup)
- Mendukung VLSM
Konfigurasi nya :
 a. Berikan IP pada Router dan PC / Laptop :
   - Untuk memberi nama pada setiap router konfigurasinya :
     - Router(config)#hostname R1
     - R1(config)#no domain-look

   - R1 : Fa 0/0   = 10.10.10.1/30
            Fa 0/1   = 192.168.1.1/24
   - PC0: Fa 0     = 192.168.1.2/24 gateway = 192.168.1.1
   - R2 : Fa 0/0   = 10.10.10.2/30
             Fa 0/1   = 192.168.2.1/24
   - PC1: Fa 0       = 192.168.2.2/24 gateway = 192.168.2.1

 b. Setting R1 :
   - R1(config)#router eigrp 10
   - R1(config-router)#network 10.10.10.0
   - R1(config-router)#network 192.168.1.0
   - R1(config-router)#no auto-summary
   - R1(config-router)#exit
   - R1(config)#do wr
     Building configuration...
     [OK]
     R1(config)#

 c. Setting R2 :
   - R2(config)#router eigrp 10
   - R2(config-router)#network 10.10.10.0
   - R2(config-router)#network 192.168.2.0
   - R2(config-router)#no auto-summary
   - R2(config-router)#exit
   - R2(config)#do wr
     Building configuration...
     [OK]
     R2(config)#
Hasil Konfigurasi :

RIPv2

RIPv2


- Open standar protocol (Cisco atau non-Cisco)
- Classless routing protocol (support default atau sub-networks)
- Mendukung VLSM
- Mendukung Autentikasi
- Menggunakan multicast address 224.0.0.9
- Administrative distance: 120
- Metric: hop count (terbaik = yang paling kecil)
- Hop ke-16 unreachable
- Load balancing 4 equal path
- Digunakan untuk organisasi kecil
- Update secara periodic dan pertukaran keseleruhan informasi routing tabel -  setiap 30 second
Keuntungan RIPv2
- Mudah dikonfigurasi
- Tidak memerlukan design seperti OSPF
- Tidak kompleks
- Less overhead
 
Kerugian RIPv2
- Utilisasi bandwidth sangat tinggi karena diperlukan untuk broadcast setiap 30 second (RIPv1)
- Terbatas pada jumlah hop (bukan bandwidth)
- Tidak scalable, hop count hanya 15
- Konvergensi rendah
 
Waktu konvergensi: waktu yang dibutuhkan oleh router untuk menggunakan route alternative
ketika best route down.
Konfigurasi nya :
a. Berikan IP pada Router dan PC / Laptop :
 - Untuk memberi nama pada setiap router konfigurasinya :
   - Router(config)#hostname R1
   - R1(config)#no domain-look

 - R1 :    Fa 0/0   = 10.10.10.1/30
              Fa 0/1   = 192.168.1.1/24
 - PC0:  Fa 0     = 192.168.1.2/24 gateway = 192.168.1.1
 - R2 :   Fa 0/0   = 10.10.10.2/30
             Fa 0/1   = 20.20.20.1/30
             Fa 0/1/0 = 192.168.2.1/24
 - PC1: Fa 0     = 192.168.2.2/24 gateway = 192.168.2.1
 - R3 : Fa 0/0     = 20.20.20.2/30
           Fa 0/1     = 192.168.3.1/24
 - PC2: Fa 0     = 192.168.3.2/24 gateway = 192.168.3.1

 b. Setting R1 :
   - R1#enable
   - R1#conf terminal
   - Enter configuration commands, one per line.  End with CNTL/Z.
   - R1(config)#router rip   
   - R1(config-router)#version 2
   - R1(config-router)#network 10.10.10.0
   - R1(config-router)#network 192.168.1.0
   - R1(config-router)#no auto-summary    
   - R1(config-router)#exit
   - R1(config)#do wr
     Building configuration...
     [OK]
     R1(config)#

 c. Setting R2 :
   - R2(config)#router rip
   - R2(config-router)#version 2
   - R2(config-router)#network 10.10.10.0
   - R2(config-router)#network 20.20.20.0
   - R2(config-router)#network 192.168.2.0
   - R2(config-router)#no auto-summary
   - R2(config-router)#exit
   - R2(config)#do wr
     Building configuration...
     [OK]
     R2(config)#

 d. Setting R3 :
   - R3(config)#router rip
   - R3(config-router)#version 2
   - R3(config-router)#network 20.20.20.0
   - R3(config-router)#network 192.168.3.0
   - R3(config-router)#no auto-summary
   - R3(config-router)#exit
   - R3(config)#do wr
     Building configuration...
     [OK]
Hasil Konfigurasi :

Install Cisco Packet Tracer pada Ubuntu 14.04

1.  Download dan letakkan file Packet Tracer 6.2
Misalkan file nya kita taruh di Desktop maka kita mengetik perintah seperti berikut :

a.  cd Desktop/
b.  tar -xvf (nama file)
2.  Untuk amd64 harus ditambahkan ini perintah ini
a.  dpkg --add-architecture i386
b.  apt-get install libnss3-1d:i386 libqt4-qt3support:i386 libssl1.0.0:i386 libqtwebkit4:i386 libqt4-scripttools:i386
3.  Lalu masuk kedalam directory cisco packet tracer
cd Desktop/(nama folder packet tracer hasil extract)/
4.  lalu ketikan perintah untuk menginstall
    ./install
5.  Tekan [enter]
6.  Tekan Y
7.  Tekan [enter]  (untuk penyimpanan default)
8.  Tekan Y
9.  chmod -R 777 /opt/pt
10.  lalu jalankan cisco packet tracer dengan mengetik

Install GNS3 pada Ubuntu 14.04 amd64 dengan menggunakan PPA

1.    install paket dan dependensi untuk GNS3
a.    apt-get install libpcap-dev uuid-dev libelf-dev cmake
b.    apt-get install python3-setuptools python3-pyqt4 python3-ws4py python3-netifaces python3-zmq python3-tornado
c.     apt-get install python3-pip
d.    pip3 install pycrypto
e.    pip3 install pycrypto –upgrade
         2.    masukan repo ppa
        add-apt-repository ppa:gns3/ppa
         3.    update ubuntu nya
        apt-get update
         4.    install GNS3 nya
        apt-get install gns3-gui

       biasa masih error pythonnya maka di update dari GNS3 ke 1.4.5
       a.    pip3 install gns3-gui==1.4.5
       b.    pip3 install gns3-server==1.4.5

      nah sampai disini mudah-mudahan sudah bisa jalan GNS3 nya

      untuk membuat tap0 sebagai penghubung jaringan rill
1.    Ketik Seperti berikut :  
apt-get install uml-utilities bridge-utils
2.    copykan file dibawah ini kedalam rc.local dengan mengetik :
nano /etc/rc.local
tunctl
ifconfig eth0 0.0.0.0 promisc up
ifconfig tap0 0.0.0.0 promisc up
brctl addbr br0
brctl addif br0 tap0
brctl addif br0 eth0
ifconfig br0 up
ifconfig br0 192.168.11.1/24
echo "1" > /proc/sys/net/ipv4/ip_forward
iptables -t nat -A POSTROUTING -s 192.168.11.0/24 -o wlan0 -j MASQUERADE

Nb : Copy diatas exit dan dibawah tanda #