Nama : Adwin Bintang Branata
|
Hari / Tanggal : Selasa / 15-11-16
| |
Kelas : XII TKJ 2
|
SK/KD : -
| |
No.Jobsheet : 1
|
Guru Bidang : Bang Maman
|
Queue Tree & Mangle

Penjelasan :
Queue Tree berfungsi
untuk mengimplementasikan fungsi yang lebih komplex dalam limit
bandwidth pada mikrotik dimana penggunaan packet mark nya memiliki
fungsi yang lebih baik. Digunakan
untuk membatasi satu arah koneksi saja baik itu download maupun upload.
Secara umum Queue Tree ini tidak terlihat berbeda dari Simple Queue.
Mangle pada
mikrotik merupakan suatu cara untuk menandai paket data dan koneksi
tertentu yang dapat diterapkan pada fitur mikrotik lainnya, sepeti pada
routes, pemisahan bandwidth pada queues, NAT dan filter rules. Tanda
mangle yang ada pada router mikrotik hanya bisa digunakan pada router
itu sendiri. Dan yang perlu diingat bahwa proses pembacaan rule mangle
ini dilakukan dari urutan pertama ke bawah.
Konfigurasi :
1. Mark Connection - TCP
Nb : Src.Address = IP WLAN
2. Mark Packet – TCP


Nb : Src.Address = IP WLAN
4. Mark Packet - UDP
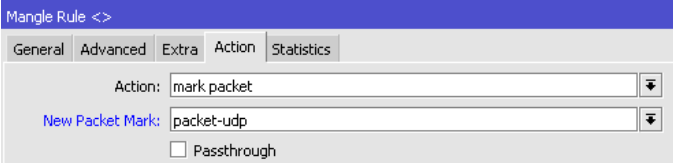

Nb : Src.Address = IP WLAN
6. Mark Packet - ICMP


Nb : Src.Address = IP WLAN
8. Mark Packet - Sisa


Nb : Parent pada "Total Download" adalah ether yang terhubung dari router ke server oleh kabel
10. QueueTree – Child TCP


